Sunrise and Sunset Cityscape at Kuala Lumpur with ND filter
As soon as I get my hands on the Square Filter, I always wanted to shoot a sunset or sunrise with it. My first try was not so successful. I did not wait until the light is up yet, therefore the image look dull. Since I did not use Cokin original filter (it's freaking expensive), the sharpness of the photo degrade slightly as you add more layer of filters on it. Therefore, for those who use the more economical "Cokin like" filters like me, I would not advised to add more than 1 filter. Besides, the filter holder are capable of holding 3 filters at a time which makes it really thick. It does cause the photos to have slight vignetting at the edge. This effect is not a bad thing, but if you would like to get rid of it, you can either adjust the vignetting control slider on lightroom or you can actually cut away the extra filter holder slot which you wouldn't use it anyway.
 |
| The set consist of a filter holder (hold up to 3 filters), 6 filters, and all sizes of ring adapter |
To do sunrise or sunset photography, there are few guidelines that I find it useful to take note.
- Check the sunrise or sunset time for your shooting location. The best light is 10 mins before and 15 mins after sunrise/sunset. However, you should always reach the location early so that you have time to decide the best location and test the exposure as the best light timing approach.
- Check the weather condition for the shooting location. As long as it is not raining then it is fine. You can get good shot although it is cloudy. Use ND filter to lengthen the exposure and make it into black and white to see if it is better.
- Research on a good location. Knowing where the sun going to rise and set is important. Make sure the place is talking advantage towards the sunrise or sunset.
- Tripod, shutter release cable / use camera timer instead for long exposure shot.
- Clean the filter and lens before you go out for shooting.
Here are some sample shot I take with or without the ND filter. I have use gradual ND8 filter most of the time for more pronounce effect.
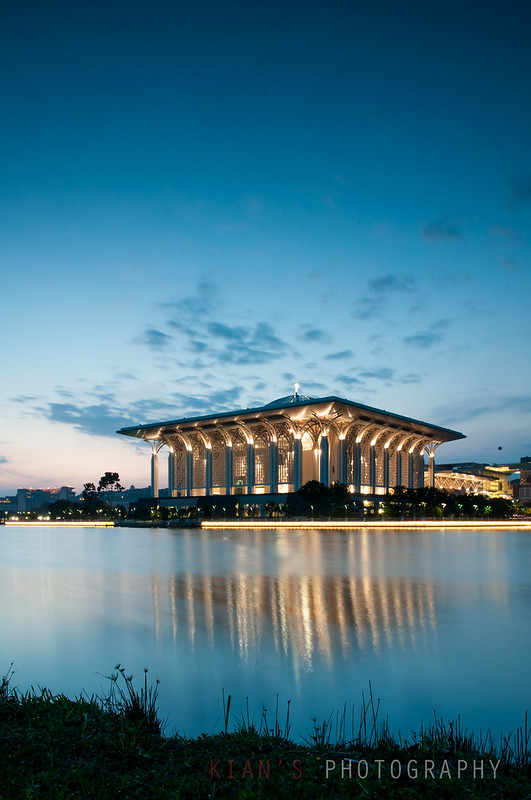 |
| ISO 200 | 17mm | f/16 | 15 sec, with gradual ND8 |
This is the first shot I take when I arrive at the location 20 mins before sunrise. The sky is still cold blue and not too dramatic.
 |
| ISO 200 | 17mm | f/16 | 5 sec |
The shot was taken roughly 10 mins before sunrise wihout the ND filter. The sun have just started to illuminated the horizon with warm tone.
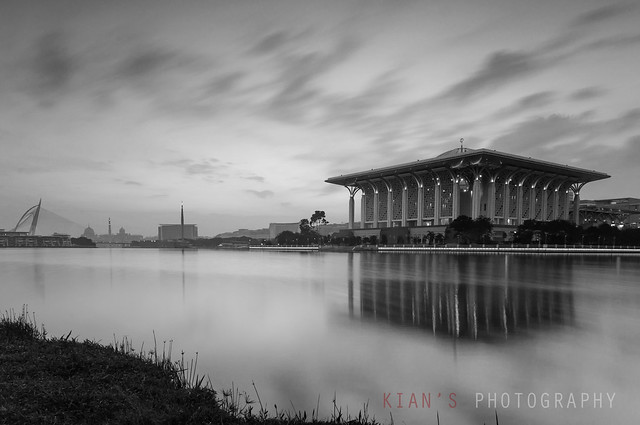 |
| ISO 200 | 17mm | f/16 | 20 sec, with gradual ND8 |
This shot was taken with gradual ND8 filter to lengthen the duration of exposure. However, the sun is not fully rise yet. Therefore I try to make it a black and white photo instead. I regret I have left this scene too early as I thought I could rush to another scene nearby for sunrise shot as well. This prove to be a mistake when I have lost on the road and miss out the golden moments I mentioning.
Not satisfied with the outcome in the morning, I have decided to take the sunset cityscapes on the same day. After hours of research and reading, I have found this place which is quite common to take sunset cityscape as it is located on the east side of KL. I arrive there early to scout the surrounding to see if I was safe to take photo. Then, I go up to the 10th floor and start setting up.
 |
| The filter add onto the lens |
|
 |
| Ready to take sunset shot |
|
The sunset right behind the Berjaya Time Square building and the cloud above turns into golden red colour.
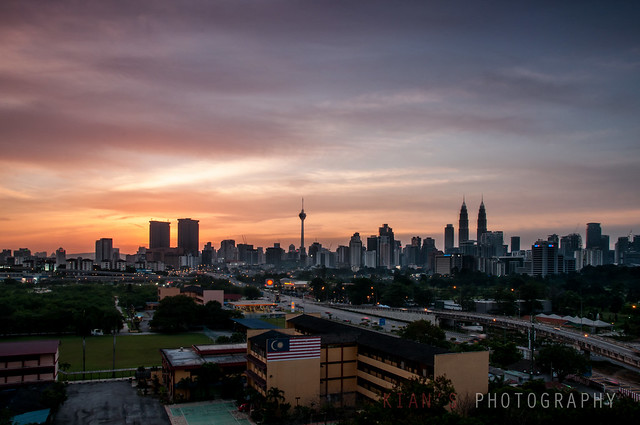 |
| ISO 200 | 17mm | f/16 | 1/5sec, with gradual ND8 |
When you have view on high ground, I couldn't resist to take series of shots to make a panorama. I use manual to ensure the exposure is consistant and post processing it at Lightroom with the same tweaking. Later on, I use a software name Image Composite Editor (ICE), a project develop by Microsoft to stitch up the photos. All you need to do it drag and drop and they will process for you with no problem. You can download it
here for FREE.
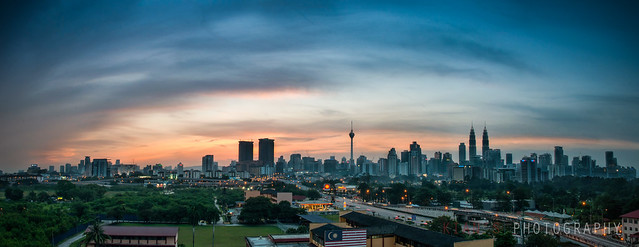 |
| ISO 200 | 17mm | f/16 | 0.4sec each, consists of 5 photos, with gradual ND8 |
When the light is pretty much gone, the city light came to live. This shot below was taken around 15 minutes after sunset. You can always zoom in to shoot close up on the city. You might get some interesting traffic trail that makes your shot more dramatic.
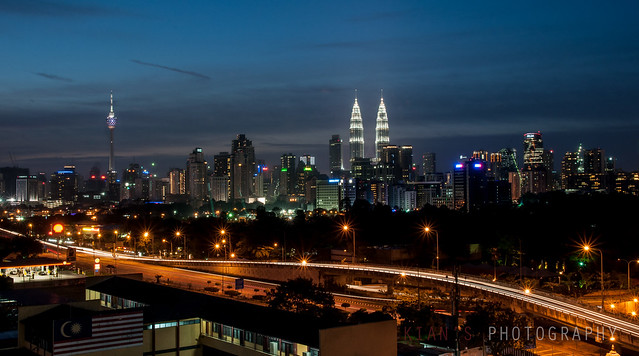 |
| ISO 200 | 27mm | f/16 | 10 sec |
Hope this helps you to get started with your sunrise and sunset shot and I will make another update when I use it near the coastline soon! Stay tune~
Sharing is caring ^^


Great and informational post! Thanks for sharing your experience on using the square graduated ND filters. Your shots are amazing which makes it seem reasonable to get these type of filters.
ReplyDeleteCan you please share what's the brand of the filter did you use? How much did it cost and is it in KL or SG you bought? I'll appreciate it much. Thanks!
-Meinard
Hi, sorry for late reply.
DeleteI bought the filter from an online website name dhgate.com. The set cause 20 USD. I dont think it has any brand on it. It actually have some purple cast on the image and would slightly degrade the sharpness. The effect is even worst when you stack them up. However you may do some post processing to correct the color cast. Good luck!
-Kian